Last updated: November 20, 2026
Set the threshold high enough that a small repair does not drain your cash buffer, but low enough that a real car repair, plumbing repair, or appliance repair can still come from savings when it should. A simple rule is to use a minimum dollar amount, then back it up with a second test: the cost should be unexpected, necessary, and not better handled by a deductible or monthly cash buffer.
Key takeaways
- A threshold is just the dollar line that decides when emergency savings is fair game.
- Small repairs need a rule because “minor” is slippery in the moment.
- A good threshold keeps everyday fixes out of savings without forcing you into debt for a real breakdown.
- The best rule uses both a dollar floor and a common-sense test, not a gut feeling alone.
- If the cost is routine, planned, or easy to cover from a cash buffer, it usually should not touch emergency savings.
What is an emergency fund withdrawal threshold?
An emergency fund withdrawal threshold is the lowest repair cost that you allow yourself to pull from emergency savings. If a repair lands under that amount, you pay from your cash buffer, checking account, or sinking fund instead. If it lands above that amount and meets your other rules, you can use the emergency fund.
This matters because small repairs are where people make sloppy choices. A $40 faucet part, a $75 appliance repair visit, or a $150 tire fix can feel urgent, but not every urgent bill belongs in the emergency fund. A threshold gives you one number to lean on when the phone rings and the quote comes in.
The point is not to make the threshold perfect. The point is to stop tiny bills from slowly hollowing out savings that should be there for bigger shocks, like a major car repair or a plumbing repair that turns into a full replacement job. If you do not set a line, almost anything can pass as an “emergency” on a stressful day.
A clean threshold also makes bookkeeping easier. You know which expenses are true withdrawals, which are minor repairs, and which should stay in your regular spending plan. That helps you see whether your emergency fund is doing its real job or acting like a backup checking account.
How do I choose the dollar amount?
Choose a dollar amount that sits above your usual small repairs and below the costs that would strain your normal monthly cash flow. Start with one number, then test it against the repairs you actually face in a year, such as appliance repair service calls, a car battery, or a pipe fix.
Use this as the decision rule: if the bill is small enough to cover without changing the rest of your month, it stays outside the emergency fund. If the bill would force you to delay essentials, use credit, or break another financial plan, it may qualify. That rule works better than guessing whether a repair “feels big.”
Here is a simple way to compare threshold styles:
| Threshold style | Best for | Good side | Weak side |
|---|---|---|---|
| Flat dollar minimum | People who want one clear line | Easy to remember | Can ignore your actual budget |
| Repair-size test | People with uneven costs | Matches real bills | Slower to decide |
| Buffer-first rule | People with a steady cash buffer | Protects savings from tiny hits | Requires discipline to keep the buffer funded |
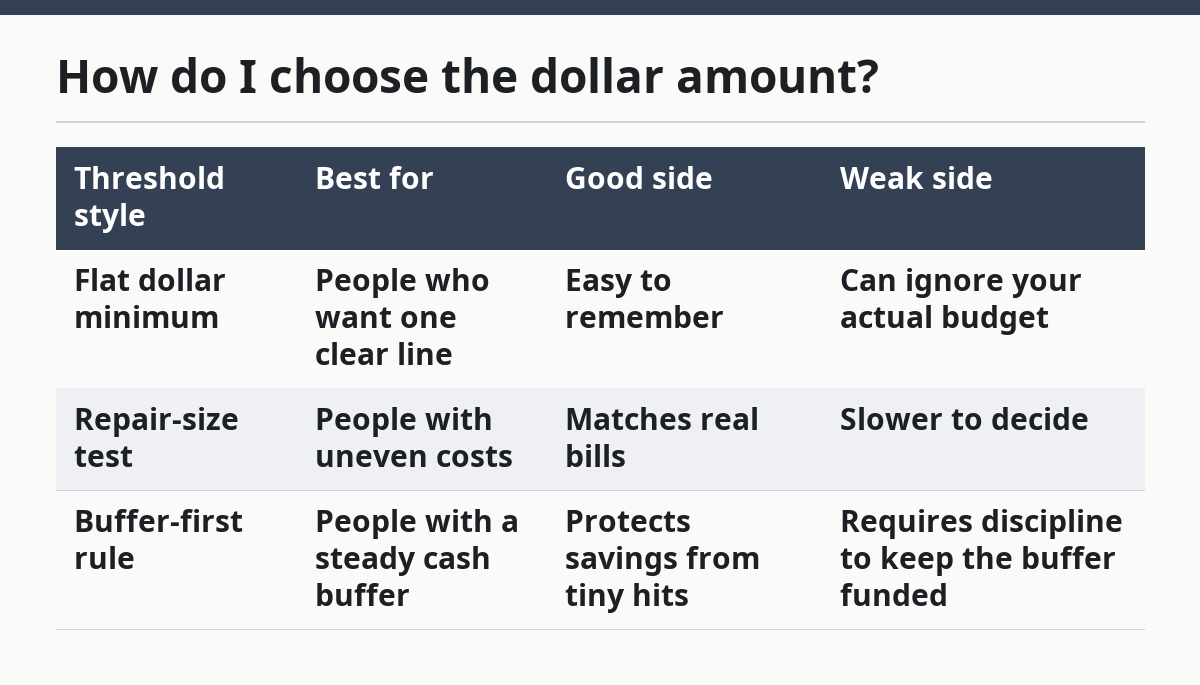
A flat dollar minimum is usually the easiest place to start. It gives you one number to remember at the repair shop, on the phone with the landlord, or while staring at a plumber’s estimate. The drawback is obvious: a single number can be too high for one household and too low for another.
That is why the better rule pairs the dollar floor with a cash buffer. The buffer covers everyday nuisance costs. The emergency fund covers the bills that are larger, less predictable, and harder to absorb.
How do I decide if a small repair counts?
A small repair counts when it is unexpected, necessary, and too large for your cash buffer to absorb without a real pinch. If it is just inconvenient, cosmetic, or easy to postpone, it usually does not belong in emergency savings.
Use this three-part filter before you withdraw:
-
Is it unexpected?
A broken dishwasher pump is unexpected. Annual maintenance is not. A repair that you knew about last month is usually not an emergency fund problem. -
Is it necessary?
A leaking pipe, a dead refrigerator, or a car repair needed to keep working can be necessary. A small upgrade because you dislike the old part is not. -
Can your cash buffer handle it?
If the cost fits inside the money you keep for minor hits, do not raid savings. The buffer exists for exactly this kind of short-term pressure.
This is where many people get tripped up. They treat a low dollar amount as the only test, then withdraw for every small repair. That creates a habit of using the emergency fund for the kind of expense a normal checking balance should cover.
The cleaner version is to set two layers. The first layer is a cash buffer for minor repair expenses. The second layer is the emergency fund withdrawal threshold for bigger shocks. That split keeps your savings from becoming a catchall.
How does a threshold work with deductible costs?
A deductible can change your threshold because a repair may be small on its own but still worth paying out of pocket if it helps you avoid a claim. A $200 repair may sit below your emergency fund line, yet still be the better choice if the repair is part of a larger insurance decision.
That does not mean every deductible should come from emergency savings. It means the threshold should account for the cost you actually face, not just the sticker price on the repair. If the repair and the deductible are both part of the same problem, compare the whole cash impact before you withdraw.
This is where a lot of generic advice falls short. It tells you to “use the emergency fund for emergencies” and stops there. Real life is messier. A plumbing repair might be a small bill, a deductible issue, or a warning sign of a much larger problem. A car repair might be cheap today and expensive next week.
The better move is to make one rule for small costs and one rule for anything that touches insurance or a larger claim. If the repair would be handled more wisely through the deductible decision, do that first. If it is simply a small household or car fix, compare it against your threshold and your cash buffer.
For broader placement of this rule inside your money system, the emergency fund withdrawal and replenishment rules hub can sit alongside it as the main reference point.
What is the best rule for small repairs?
The best rule for small repairs is to keep a minimum dollar amount, then require the repair to be unavoidable before you touch emergency savings. That keeps the rule simple enough to use in real time and strict enough to stop leaks.
A practical version looks like this:
- Under the threshold: pay from cash buffer or regular spending.
- At or above the threshold: review whether the repair is necessary and unexpected.
- If it passes both tests: withdraw from emergency savings.
- If it fails either test: do not withdraw.
This is not the same as saying small repairs never matter. They do matter. A series of minor appliance repair calls, a few car repair bills, and a plumbing repair can add up fast. But that is exactly why the threshold should be a guardrail, not a trapdoor.
A good rule also includes one honest limitation: if your threshold is set too low, you will make tiny withdrawals all year. If it is set too high, you may end up using debt for repairs that should have come from savings. The wrong threshold is worse than no threshold because it creates false confidence.
If you are unsure, choose the stricter version for 30 days and watch what happens. If you keep bumping into the line for normal expenses, your cash buffer may be too small. If you never use the fund even when the cost is clearly bigger than a nuisance repair, the line may be too high.
What mistakes make this rule fail?
The biggest mistake is setting the threshold by emotion instead of by repair size. A bill feels urgent when the sink is leaking or the car will not start, but urgency is not the same as emergency fund use. That mistake drains savings on costs that should have been handled by a cash buffer.
A second mistake is leaving no room for judgment. A rule that says “anything under $300 stays out” sounds tidy, but it can fail when a repair at $275 is essential and another at $325 is a needless fix. Numbers help, but they do not replace the rest of the decision.
A third mistake is using the fund for every minor repair because the account balance is there. That is the fastest way to turn an emergency fund into a routine expense account. The cost is not just the withdrawal itself; it is the lost protection if a larger problem shows up a week later.
The fix is plain. Make the threshold visible, keep the cash buffer separate, and give yourself a short checklist before each withdrawal. If you can answer “yes” to unexpected, necessary, and above the line, the withdrawal makes sense. If not, leave the emergency fund alone.
How do I keep the rule usable month after month?
Keep the rule usable by writing it down in one sentence and tying it to one number. A rule like “Use emergency savings only for unexpected repairs above my threshold, after the cash buffer is used” is easier to follow than a long checklist you never open again.
Review the number after a few months of actual bills. If your ordinary small repairs are always below it, the threshold may be fine. If you are constantly covering basic car repair or appliance repair costs with emergency savings, the line is too low, or the cash buffer is too thin.
A written rule also helps when money is tight. During a bad month, it is easy to blur the line between “I want to use savings” and “I should use savings.” A one-line threshold cuts through that fog. It gives you a standard answer before stress starts rewriting the plan.
The real goal is not to be strict for its own sake. The goal is to preserve emergency savings for the bills that can break the month, not the ones that merely annoy it.
Should I use emergency savings for a $200 repair?
Maybe, but only if $200 is above your chosen threshold and the repair is unexpected and necessary. A $200 bill can be either a small nuisance or a real hit, depending on your cash buffer and monthly budget.
If you can cover it without upsetting rent, food, or other essentials, it often belongs outside emergency savings. If paying it would force debt or leave you short on basics, it is closer to a valid withdrawal.
What counts as too small for an emergency withdrawal?
Too small means a cost that your cash buffer, checking account, or regular monthly spending can handle without strain. A minor repair that does not threaten the rest of the month usually stays out of the fund.
That often includes routine fixes, convenience repairs, and costs you knew were likely. If the bill is annoying but not disruptive, it is probably too small for an emergency withdrawal.
How do I stop using my emergency fund for minor expenses?
Use a written threshold and keep a separate cash buffer for small repairs. The fund should not be the first stop for every car repair, plumbing repair, or appliance repair that shows up.
If you keep dipping into it, raise the bar for withdrawals and make the buffer easier to use. A clearer rule beats willpower when the bill is sitting in front of you.
Drafted with AI; not yet reviewed by a person.